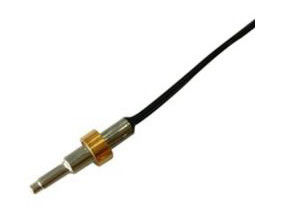
Samsung Refrigerator Spare Part Defrost Micro Temperature Sensor 5KOhm 3218 With ABS Housing 7x25mm Connector 35965-020
General
Designed to be equivalent for Samsung refrigerator DA32-00006W with quick delivery and competitive price , global market shown DA32-00006W part is expensive and long delivery. Pls note it is equivalent with same performances on thermistor,cable ,connector etc. but not orginal Samsung part .
Samsung Refrigerator Spare part Defrost Temperature Sensor. The defrost temperature sensor detects the temperature inside the refrigerator and sends information to the electronic control.
Please Note: This is intended as a guideline only, as other items can cause the same symptoms.
This part is also known as a thermistor.
__________________________________________________________________________ Download________
Features
Samsung OEM Part DA32-00006W equivalent
All Our Parts Approved For A Proper Fit
Brand New in Original Retail Packaging
DA32-00006W Temperature Sensor spare part
Part Number DA32-00006W equivalent replaces DA32-00006B, DA32-00006C, DA32-00006D, DA32-00006L, DA32-00006M, DA32-00006U, DA32-10105R.
Application
Possible Repair Solution For:
Fridge section is too warm, Fridge section is too cold, Freezer section is too warm, Freezer section is too cold, Frost buildup, Leaking water.
Dimension

Material
| NO |
Material Name |
Item/PN |
| 2-1. |
Element |
R0=13.251KΩ±2% B0/50=3218±1% |
| 2-2. |
Housing |
Φ7×25 ABS (White) |
| 2-3. |
Coating |
Epoxy |
| 2-4. |
Lead Wire |
UL2651 AWG26# 105℃ 300V (Yellow) |
| 2-5. |
Terminal |
Connector 35965-0200 (White/Blue) |
Performances
| NO |
Item |
Sign |
Test Conditions |
Min. |
Normal value |
Max. |
Unit |
| 4-1. |
Resistance at 0℃ |
R0 |
Ta=25±0.05℃
PT≦0.1mw
|
13.015 |
13.251 |
13.514 |
kΩ |
| Resistance at 25℃ |
R25 |
4.95 |
5 |
5.05 |
| 4-2. |
B Value |
B0/50 |
|
3185.82 |
3218.0 |
3250.18 |
k |
| 4-3. |
Dissipation factor |
σ |
Ta=25±0.5℃ |
≦3.0 |
mW/℃ |
| 4-4. |
Time constant |
τ |
Ta=25±0.5℃ |
≧2 |
sec |
| 4-5. |
Operating temp.range |
/ |
/ |
-40 |
/ |
+80 |
℃ |
| 4-6 |
Insulation resistance |
/ |
500V DC |
>100 |
MΩ |
| 4-7. |
Withstand voltage test |
/ |
1000V AC,1mA, 1min |
No Abnormalities |
Sec |
Actual Product Photos


Resistance Vs Temperature Chart
| R-T CONVERSION TABLE |
| R0=13.251KΩ±2% B0/50=3218±1% |
| T/℃ |
Rmin |
Rcen |
Rmax |
T/℃ |
Rmin |
Rcen |
Rmax |
| -40 |
85.953 |
89.360 |
92.894 |
-2 |
14.122 |
14.416 |
14.715 |
| -39 |
81.456 |
84.640 |
87.939 |
-1 |
13.543 |
13.819 |
14.100 |
| -38 |
77.225 |
80.200 |
83.281 |
0 |
13.015 |
13.251 |
13.514 |
| -37 |
73.241 |
76.022 |
78.901 |
1 |
12.464 |
12.708 |
12.956 |
| -36 |
69.489 |
72.089 |
74.779 |
2 |
11.962 |
12.191 |
12.424 |
| -35 |
65.954 |
68.386 |
70.900 |
3 |
11.483 |
11.698 |
11.916 |
| -34 |
62.621 |
64.896 |
67.247 |
4 |
11.026 |
11.228 |
11.432 |
| -33 |
59.479 |
61.608 |
63.806 |
5 |
10.590 |
10.779 |
10.971 |
| -32 |
56.514 |
58.507 |
60.563 |
6 |
10.173 |
10.351 |
10.531 |
| -31 |
53.716 |
55.581 |
57.506 |
7 |
9.775 |
9.942 |
10.110 |
| -30 |
51.075 |
52.821 |
54.622 |
8 |
9.395 |
9.551 |
9.709 |
| -29 |
48.580 |
50.215 |
51.901 |
9 |
9.031 |
9.178 |
9.326 |
| -28 |
46.222 |
47.755 |
49.333 |
10 |
8.687 |
8.824 |
8.963 |
| -27 |
43.994 |
45.430 |
46.908 |
11 |
8.352 |
8.481 |
8.611 |
| -26 |
41.887 |
43.233 |
44.617 |
12 |
8.034 |
8.155 |
8.277 |
| -25 |
39.894 |
41.156 |
42.453 |
13 |
7.730 |
7.844 |
7.958 |
| -24 |
38.008 |
39.191 |
40.406 |
14 |
7.440 |
7.546 |
7.653 |
| -23 |
36.223 |
37.332 |
38.471 |
15 |
7.161 |
7.261 |
7.361 |
| -22 |
34.533 |
35.573 |
36.641 |
16 |
6.895 |
6.988 |
7.082 |
| -21 |
32.932 |
33.908 |
34.908 |
17 |
6.640 |
6.727 |
6.815 |
| -20 |
31.415 |
32.330 |
33.269 |
18 |
6.396 |
6.477 |
6.559 |
| -19 |
29.977 |
30.836 |
31.716 |
19 |
6.162 |
6.238 |
6.315 |
| -18 |
28.613 |
29.419 |
30.245 |
20 |
5.938 |
6.009 |
6.080 |
| -17 |
27.320 |
28.076 |
28.851 |
21 |
5.723 |
5.790 |
5.856 |
| -16 |
26.093 |
26.803 |
27.529 |
22 |
5.518 |
5.579 |
5.641 |
| -15 |
24.928 |
25.595 |
26.276 |
23 |
5.320 |
5.378 |
5.436 |
| -14 |
23.822 |
24.448 |
25.088 |
24 |
5.131 |
5.185 |
5.238 |
| -13 |
22.772 |
23.360 |
23.960 |
25 |
4.950 |
5.000 |
5.050 |
| -12 |
21.774 |
22.326 |
22.889 |
26 |
4.772 |
4.822 |
4.872 |
| -11 |
20.826 |
21.344 |
21.873 |
27 |
4.602 |
4.651 |
4.701 |
| -10 |
19.925 |
20.411 |
20.908 |
28 |
4.438 |
4.488 |
4.538 |
| -9 |
19.068 |
19.525 |
19.990 |
29 |
4.282 |
4.331 |
4.381 |
| -8 |
18.253 |
18.682 |
19.119 |
30 |
4.131 |
4.180 |
4.230 |
| -7 |
17.477 |
17.880 |
18.290 |
31 |
3.987 |
4.036 |
4.085 |
| -6 |
16.739 |
17.117 |
17.502 |
32 |
3.848 |
3.897 |
3.946 |
| -5 |
16.036 |
16.391 |
16.753 |
33 |
3.715 |
3.764 |
3.812 |
| -4 |
15.367 |
15.701 |
16.040 |
34 |
3.588 |
3.636 |
3.684 |
| -3 |
14.729 |
15.043 |
15.361 |
35 |
3.465 |
3.512 |
3.560 |
| R-T CONVERSION TABLE |
| R0=13.251KΩ±2% B0/50=3218±1% |
| T/℃ |
Rmin |
Rcen |
Rmax |
T/℃ |
Rmin |
Rcen |
Rmax |
| 36 |
3.347 |
3.394 |
3.441 |
74 |
1.019 |
1.045 |
1.072 |
| 37 |
3.234 |
3.280 |
3.327 |
75 |
0.990 |
1.016 |
1.043 |
| 38 |
3.125 |
3.171 |
3.217 |
76 |
0.963 |
0.988 |
1.014 |
| 39 |
3.021 |
3.066 |
3.112 |
77 |
0.936 |
0.961 |
0.987 |
| 40 |
2.920 |
2.965 |
3.010 |
78 |
0.910 |
0.935 |
0.960 |
| 41 |
2.823 |
2.868 |
2.912 |
79 |
0.885 |
0.910 |
0.934 |
| 42 |
2.730 |
2.774 |
2.818 |
80 |
0.861 |
0.885 |
0.909 |
| 43 |
2.641 |
2.684 |
2.728 |
81 |
0.838 |
0.861 |
0.885 |
| 44 |
2.555 |
2.597 |
2.641 |
82 |
0.815 |
0.838 |
0.862 |
| 45 |
2.472 |
2.514 |
2.557 |
83 |
0.793 |
0.816 |
0.839 |
| 46 |
2.392 |
2.433 |
2.476 |
84 |
0.772 |
0.794 |
0.817 |
| 47 |
2.315 |
2.356 |
2.398 |
85 |
0.751 |
0.773 |
0.796 |
| 48 |
2.241 |
2.282 |
2.323 |
86 |
0.731 |
0.753 |
0.775 |
| 49 |
2.170 |
2.210 |
2.250 |
87 |
0.712 |
0.733 |
0.755 |
| 50 |
2.100 |
2.140 |
2.180 |
88 |
0.693 |
0.714 |
0.736 |
| 51 |
2.035 |
2.074 |
2.113 |
89 |
0.675 |
0.696 |
0.717 |
| 52 |
1.971 |
2.010 |
2.048 |
90 |
0.658 |
0.678 |
0.698 |
| 53 |
1.910 |
1.948 |
1.986 |
91 |
0.641 |
0.660 |
0.681 |
| 54 |
1.851 |
1.888 |
1.925 |
92 |
0.624 |
0.644 |
0.664 |
| 55 |
1.794 |
1.830 |
1.867 |
93 |
0.608 |
0.627 |
0.647 |
| 56 |
1.739 |
1.775 |
1.811 |
94 |
0.593 |
0.611 |
0.631 |
| 57 |
1.686 |
1.721 |
1.757 |
95 |
0.578 |
0.596 |
0.615 |
| 58 |
1.635 |
1.669 |
1.705 |
96 |
0.563 |
0.581 |
0.600 |
| 59 |
1.585 |
1.619 |
1.654 |
97 |
0.549 |
0.567 |
0.585 |
| 60 |
1.537 |
1.571 |
1.605 |
98 |
0.535 |
0.553 |
0.570 |
| 61 |
1.491 |
1.525 |
1.558 |
99 |
0.522 |
0.539 |
0.557 |
| 62 |
1.447 |
1.480 |
1.513 |
100 |
0.509 |
0.526 |
0.543 |
| 63 |
1.404 |
1.436 |
1.469 |
101 |
0.496 |
0.513 |
0.530 |
| 64 |
1.363 |
1.394 |
1.426 |
102 |
0.484 |
0.500 |
0.517 |
| 65 |
1.323 |
1.354 |
1.385 |
103 |
0.472 |
0.488 |
0.505 |
| 66 |
1.284 |
1.315 |
1.346 |
104 |
0.461 |
0.476 |
0.493 |
| 67 |
1.247 |
1.277 |
1.307 |
105 |
0.449 |
0.465 |
0.481 |
| 68 |
1.211 |
1.240 |
1.270 |
106 |
0.439 |
0.454 |
0.469 |
| 69 |
1.176 |
1.205 |
1.234 |
107 |
0.428 |
0.443 |
0.458 |
| 70 |
1.142 |
1.171 |
1.200 |
108 |
0.418 |
0.432 |
0.448 |
| 71 |
1.110 |
1.138 |
1.166 |
109 |
0.408 |
0.422 |
0.437 |
| 72 |
1.078 |
1.106 |
1.134 |
110 |
0.398 |
0.412 |
0.427 |
| 73 |
1.048 |
1.075 |
1.103 |
|
|
|
|
How to Replace a Defrost Sensor in a Side-by-Side Refrigerator
This refrigerator repair guide gives step-by-step instructions for replacing the defrost sensor in a side-by-side refrigerator. The defrost sensor&sh;also called a defrost bi-metal thermostat&sh;shuts off the defrost heater if the heater gets hot enough to damage the evaporator. If the defrost sensor fails, the heating element doesn't turn on, and frost builds up on the evaporator resulting in warm temperatures in the refrigerator. If your defrost sensor is defective, replace it with the manufacturer-approved replacement part.
Time required: Less than 45 min.
Repair difficulty: 3
Parts Required: Defrost sensor,Cable ties,Silicone sealant,Wire nuts
Parts Required: Defrost sensor.Cable ties,Silicone sealant,Wire nuts
Before you begin
Wear work gloves to protect your hands. Safely store any food that could deteriorate while the refrigerator is shut off.
Instructions
Warning: Undertaking repairs to appliances can be hazardous. Use the proper tools and safety equipment noted in the guide and follow all instructions. Do not proceed until you are confident that you understand all of the steps and are capable of completing the repair. Some repairs should only be performed by a qualified technician.
Step 1: Disconnect the electrical power
Unplug the refrigerator or shut off the circuit breaker for the refrigerator.
Step 2: Remove shelf supports from the freezer
Remove the shelves and baskets from the freezer compartment. Remove the screws from the shelf supports on the right interior wall of the freezer and pull the supports out.
Tip: If necessary, refer to your owner's manual for guidance in removing baskets and shelves from the freezer.
Remove the shelves and baskets.
Remove the right-side shelf supports.
Step 3: Remove the back panel
Remove the mounting screws that secure the inside back panel of the freezer. Pull the bottom of the panel outward slightly to release it.
Remove the back panel screws.
Remove the back panel.
Step 4: Unclamp the defrost sensor from the evaporator
Note the positioning of the defrost sensor. Release the metal clip that holds the defrost sensor to the refrigerant line located above the evaporator.
Tip: Take a digital photo of the defrost sensor to help you position the replacement correctly.
Release the clip that secures the defrost sensor to the refrigerant line.
Step 5: Remove the defrost sensor
Cut the brown and pink wires near the defrost sensor and pull the defrost sensor out of the freezer.
Step 6: Install the new defrost sensor
Use a wire stripper to remove the insulation from the ends of the pink wire and brown wire on the new sensor. Strip the ends of the pink wire and brown wire in the harness above the evaporator. Use wire nuts to connect the matching wires.
To keep the connection dry, squeeze silicone sealant into the open ends of the wire nuts.
Step 7: Clip the defrost sensor onto the refrigerant line
Clip the new defrost sensor onto the refrigerant line above the evaporator. Position it in the same manner as the original defrost sensor.
Without disturbing the sealant on the wire nuts, push the wires above the evaporator. Use a cable tie to fasten the wires to other wires in the harness to keep them out of the way.
Step 8: Reinstall the back panel
Reinstall the back panel and replace the mounting screws. Over tightening the screws can crack the freezer liner or the mounting rails. Rotate the screws until they stop and then snug them up with a final twist. Reinstall the baskets and shelves.
Step 9: Restore electrical power
Plug in the refrigerator or turn on the house circuit breaker to restore power.

 Your message must be between 20-3,000 characters!
 Please check your E-mail!
  Your message must be between 20-3,000 characters!
 Please check your E-mail!
